
This post may contain affiliate links. Read our disclosure policy here.
Much healthier (and tastier) than store-bought, this homemade fruit leather is easy to make using your favorite fruit with just 2 ingredients.
Strawberry Fruit Leather
I first published this fruit leather recipe in my cookbook, The Best Kid's Lunches on the Planet, back in 2013 - and it's been a reader favorite ever since.
It's one of the easiest, most fun snacks to make at home.
Ingredients
To show you how to make it, I used strawberries in the recipe, but you can use any fruit in the same quantity. Adding a little lemon juice to the mixture keeps the color nice and bright.
- Fruit: wash, peel, and dice any fruit. Blueberries, mango, raspberries, peaches, apples, all work great.
- Honey: a little to sweeten. You can use granulated sugar, too, but it doesn’t blend as well. The sweetener can be omitted.
Fruit Leather with Frozen Fruit
You’ll need to thaw the frozen fruit first, discard any excess liquid, and then blend it to a smooth consistency.
How to Make Fruit Leather
- Prep
Set the oven to the lowest temperature available, with 200F being the highest. The oven rack should be positioned in the middle of the oven, and the baking sheet should be lined with parchment paper. Wax paper will burn. - Blend
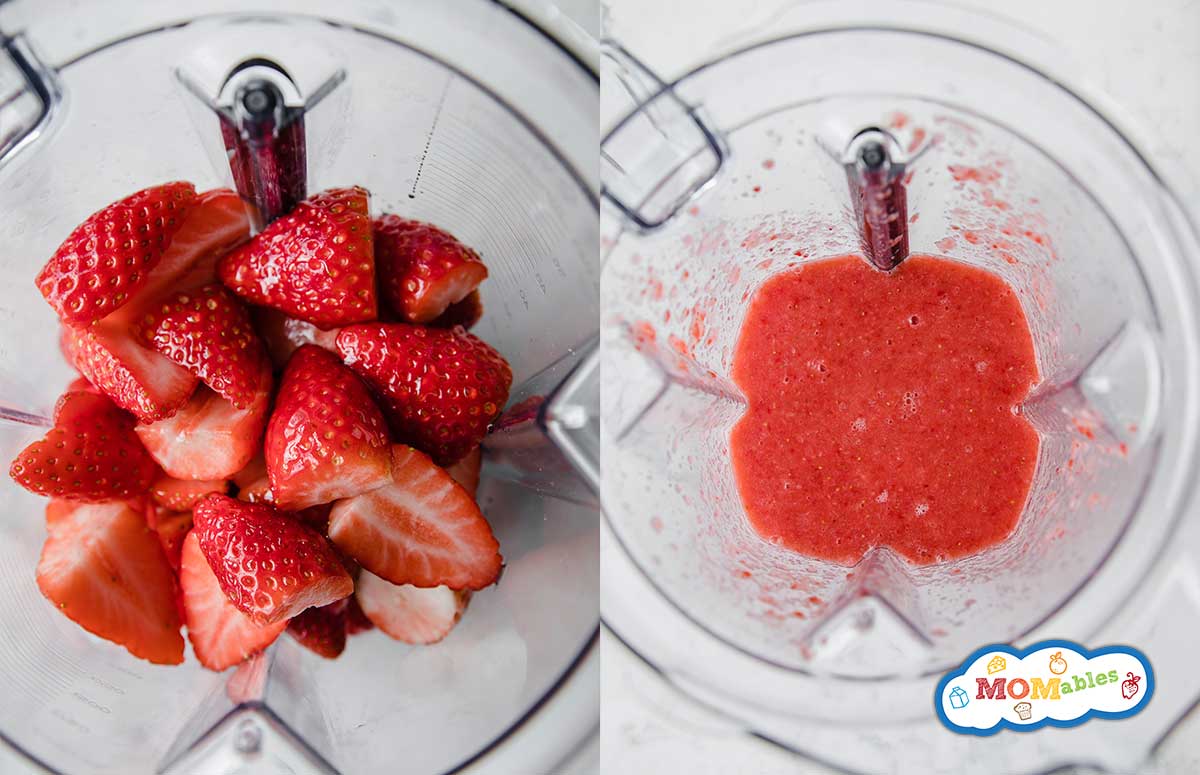
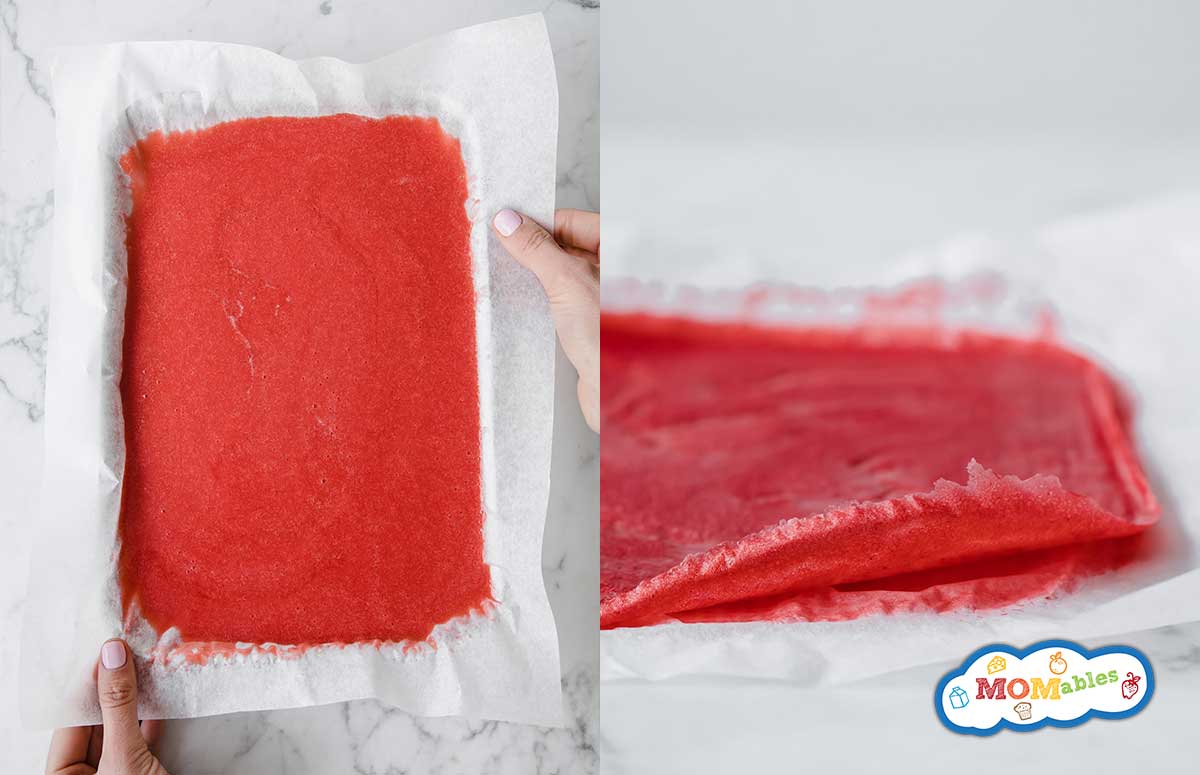
Wash, chop, and prep your fruit. Blend it until smooth. Spread it evenly on the parchment paper, ensuring the middle isn’t thicker than the ends, as this takes the longest to dry. - Bake
Bake it for about 4 hours (at 200F) until the middle no longer looks dark and wet and the sides begin to lift away. - Cool & Store
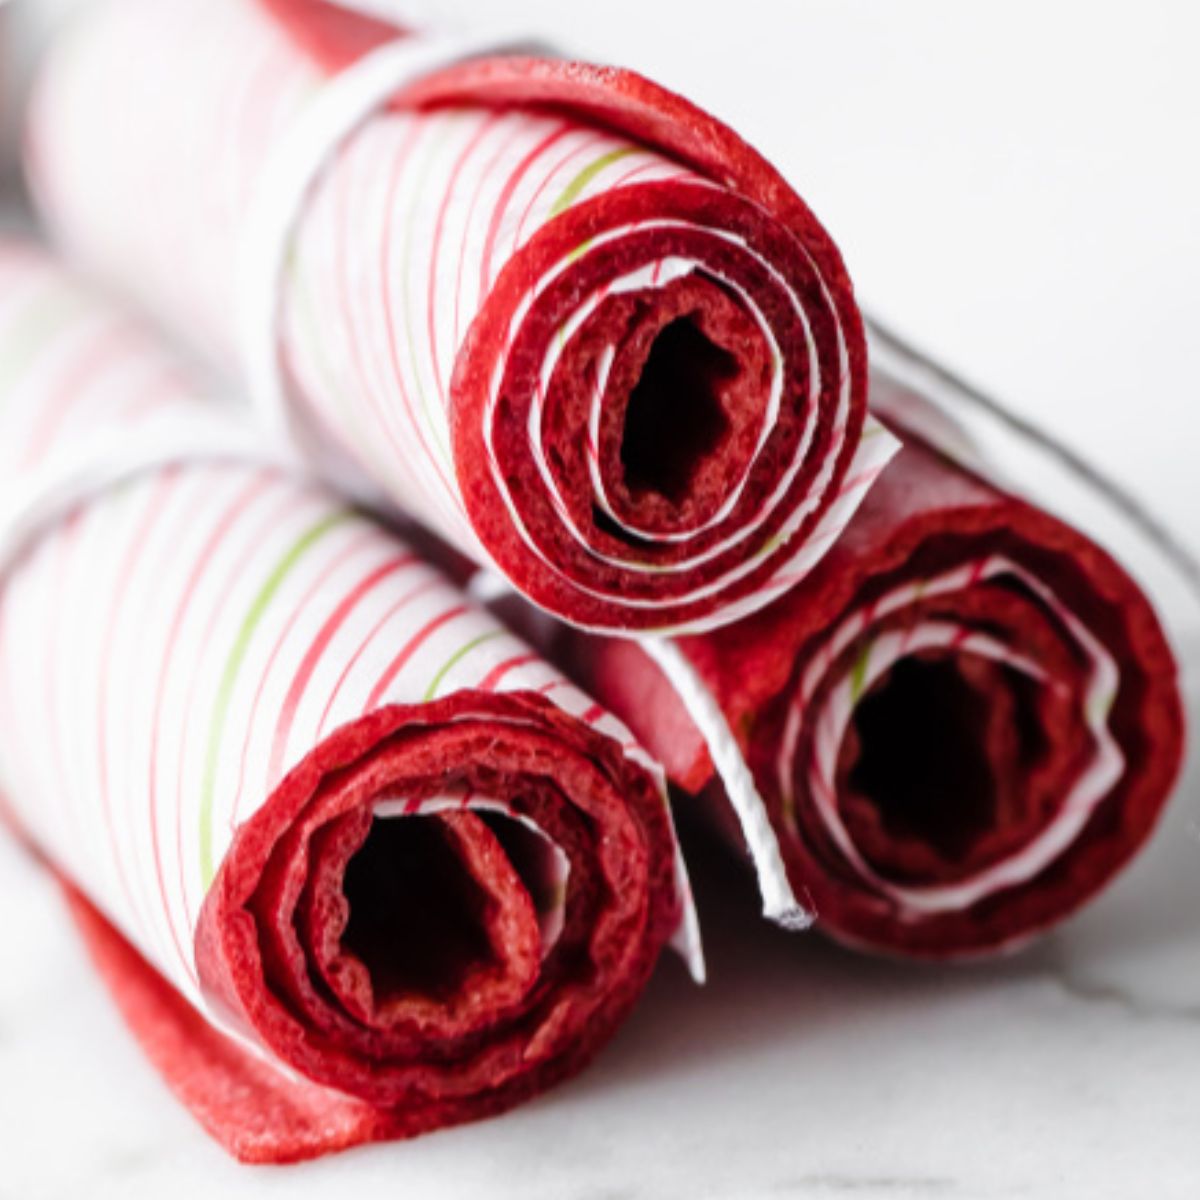
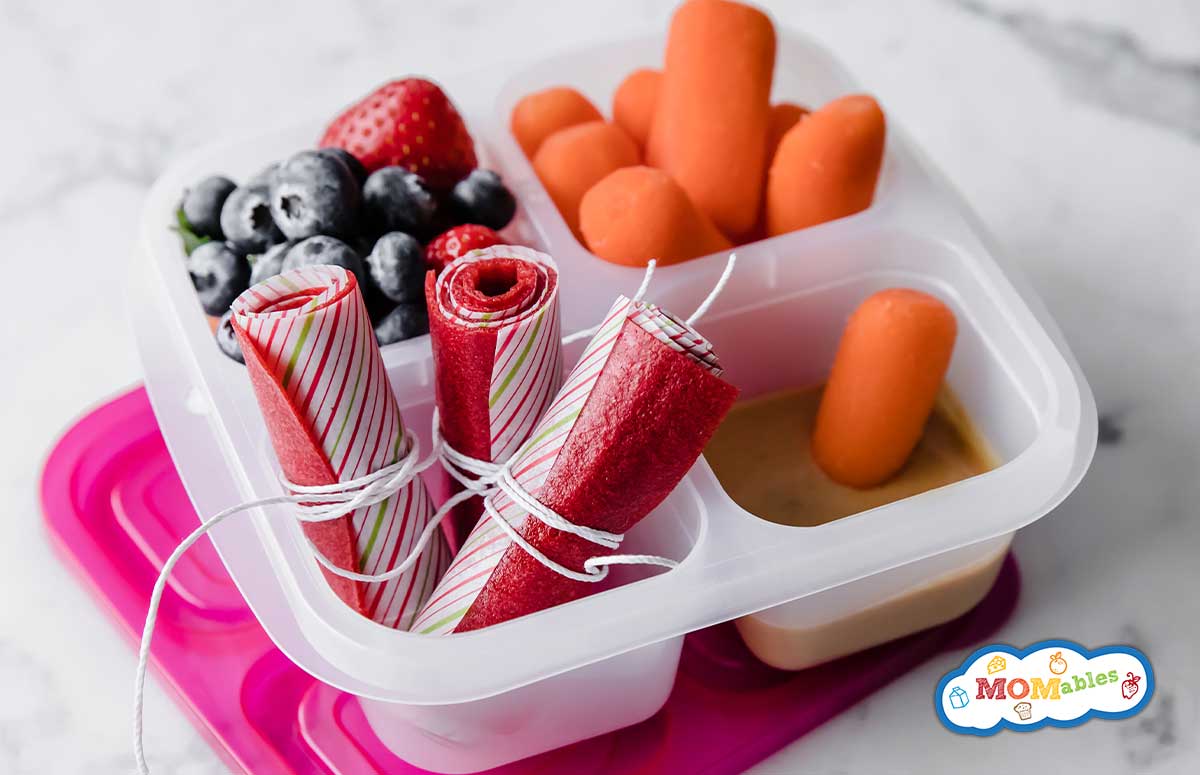
Allow the fruit leather sheet to cool completely for 4 hours on the baking sheet, or overnight. Cut it into strips using scissors, roll them up, and store in an airtight container for up to a week.
First time making fruit leather? Watch how easy this recipe comes together in this video:
Other Fruit Variations
Follow this recipe and swap the strawberries for blueberries, peaches, apples, pineapple, mango, pears, or raspberries.
Easy Fruit Leather Recipe

Watch How It’s Made:
Ingredients
- 4 cups diced strawberries, any fruit
- 2 tablespoons honey, or sugar
- 1 tablespoon lemon juice, optional
Instructions
Prep the oven:
- Preheat oven to the lowest setting, between 150F to 200F, with the top oven rack in the middle position. If making more than one tray, place the second oven rack right below the first. Line a baking sheet with parchment paper. Do not use wax paper.
Blend:
- Add the berries and honey into a blender and blend until smooth. Add the lemon juice to keep the fruit leather bright in color; it's not essential to the recipe, just for looks. To remove the berry seeds, pour through a sieve.
- Pour the mixture onto the prepared baking sheet and, with the back of a silicone spatula, spread the berry mixture into a thin, even layer. The middle tends to be thicker than the sides, spread this out to just as thin since the middle is the last thing to dry out.
Bake:
- Bake for 4 to 6 hours, until the fruit leather peels away easily from the parchment and the middle is no longer wet. If baking multiple baking sheets, swap positions after 2 to 3 hours. Remove the tray from the oven onto the counter to fully cool down for 4 hours or overnight.
Roll them up:
- With scissors, cut the parchment paper from one end to the other, into strips. Roll them up, parchment and all.
- To eat, separate the fruit leather from the parchment as you go.
Storage:
- Store the fruit leather rolled up in a zip bag or an airtight container in the fridge or pantry for up to 1 month.
Notes
- Oven temperatures will vary. Start checking the fruit leather after 3 to 4 hours. If you leave it in too long it will crisp up.


Vandana says
Can we do it in air fryer
MOMables - Laura says
Only if your airfryer has a dehydrating function. In that case, follow the directions in the instruction manual for that feature.
Nicole says
I can not find the answer to my simple question, can you make fruit leather with frozen fruit ? If you can how ?
MOMables - Laura says
The simple answer is: Yes, you can. You’ll need to thaw the frozen fruit first, then puree it in the blender like in the fresh fruit directions. Depending on the fruit and how much water it retains, using frozen fruit, even after thawing, might add 15 to 20 additional minutes to the dehydration process.
Sana says
I made this recipe with my class, a room of 12 2nd and 3rd graders on a lesson of mixing and measuring; and a lesson on fresh fruits can be nutritional healthy and just as good as pre-packed stuff. It was a hit with the students and parents alike. So many lessons packed into one delicious recipe! Thank you for this, I found food to be a good motivator for excellent life lessons.
Adriana says
recipe looks good! i’ll give it a try with some frozen fruits I have. What would you recommend for storing and how long do you think they will last, in case I decide to make a bigger batch next time. Thank you for your recipes! me and my family enjoy them a lot!
Z says
I need some help can i use Sugar instead of honey
MOMables-Laura says
Hi Z, the honey can’t be replaced with sugar. Honey gives it the right pourable texture.
DKRosa says
Can I use Watermelon?
MOMables-Laura says
Watermelon’s high water content makes it nearly impossible for all of the moisture to evaporate when making fruit leather. If you have extra watermelon you can make icees like in this post: https://www.momables.com/1-ingredient-watermelon-icee/
Jonathan says
I think you would be able to do it if you put it through a strainer first and take it out from the top to remove the moisture
cathie says
Why do people call this leather instead of just fruit roll-ups? is there a texture difference? thickness? The word leather sort makes me think of rawhide…ewww.
MOMables - Laura says
The term “fruit leather” and “fruit roll-ups” are both used when referring to this recipe. Fruit “leather” is the original term and it is often found as flat pieces. Fruit “roll ups” was the term coined by the packaged variety and also because they rolled theirs for packaging. Same recipe two terms.
Ellen Murphy says
Does the packaged kind of fruit leather/ roll-ups just use fruit or do they add preservatives to those products? This looks really easy. I’m going to try it! Thank you for posting.
MOMables-Laura says
Most prepackaged fruit roll-ups are made with corn syrup and other preservatives, these are much better for you.
DONELLE PERKOVICH says
I made these but parchment paper turns brown and not as appealing. If I put finished fruit onto fresh piece of parchment paper will it still stick to it?
MOMables-Laura says
I’ve not tried this method, so I can’t say for sure if it will work. If you try it and it works, do let me know!
Susie Dams says
Can this be made in a crock pot? With energy costs rising, I try not to use my oven much during the summer months.
MOMables-Laura says
Hi, Susie, this recipe will not work in a slow cooker.
Carissa says
I cook them in my dehydrator so no parchment paper needed. I wrap them in plastic wrap and it gives that little bit of “cling”
Sarah says
Hello, I tried this with hot honey and frozen strawberry and then regular honey and frozen blueberry. The strawberry came out right but the blueberry had the texture of dried fruit and not fruit leather. Do you think i maybe over dried it or didn’t get it dry enough? Thank you for the recipe
MOMables-Laura says
Hi Sarah, I’m not sure what happened here. How long did you keep it in the oven?
Rachael says
I did as instructed with an Excalibur dehydrator (I can set the temp to whatever I want). It’s delicious, but it sealed to the parchment paper. Any tips on getting it off?
MOMables - Laura says
I have not tried it with the Excalibur dehydrator. I often make these in the oven and my dehydrator has some silicone-like liners so nothing sticks. Usually, if you wait until they cool down they “peel” right off.I hope this helps.
Early Bird says
I make mine in a dehydrator. Wipe the trays with a very light layer of spray oil using a paper towel. Too much oil will change the taste, so be sure it is only a teeny bit. Dried rolls will peel right off.
Dinah Sisson says
I made these today and they turned out wonderful! I also used an Excalibur dehydrator and if you look in the book that comes with it, it states for fruit leathers to set the temp to 135 for 4-6 hours. I did for 4 hours and they turned out great. The first couple of sheets were poured a little too thin and we had to work carefully to pull off ( I had used the sheets that was ordered with the Excalibur) so next time I’m going to just use parchment paper. The other trays/sheets seemed to have the right amount poured and came off great! I pulled some peaches out of the freezer I had put up this summer and combined that with fresh apples I had gotten at an orchard. Thanks so much for the recipe, will be making multiple times!
Alison says
I did strawberries, Granny Smiths, and rhubarb — no honey. Delicious! One batch was fine and easy enough to pull off (I used tin foil as I don’t have parchment paper), but the other two were still wet after 4 hours. So make it thin if you don’t want a hot house!
Caitlin says
After i cook this fruit leather and i cut it into strips for snacks later, how can i store them , and for how long?
MOMables says
in an airtight container or zip bag for 2 weeks. Enjoy!
Lisa says
Hi there. Can you actually make it thicker if you want? Like a 1/2 inch. I wanted to make a sheet and cut it into little cubes. :)
MOMables says
That might take a really long time to dehydrate. I’ve never tried it that thick.
Eliza says
A great way to get the greens off of strawberries is to use a stiff straw to “core” them. Start at the pointed part of the strawberry and push up through the center toward the leaves. the top will just pop off. I think this way is faster and more of the strawberry is usable. Maybe this is why they are called “straw”berries ;)
Thanks for the insperation, these are going to be so delicious!