
This post may contain affiliate links. Read our disclosure policy here.
Learn how to make the classic chewy oatmeal raisin bar at home with this no-bake recipe!

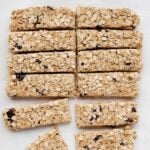
Soft and Chewy No-Bake Granola Bars
If your kid loves those chewy bars with the oat man on them, but you don't like buying them, this Healthy Oatmeal Raisin Granola Bars recipe is for you! Goodbye box, hello homemade!
I love this recipe because it's also a no-bake recipe! You read it correctly, there’s no need to turn on the oven. Woohooo!!! Making a tasty and healthy snack kids devour with real ingredients and very little work involved… No doubt this recipe is a win!
The little ones -and you- can enjoy these no-bake granola bars as a snack to eat on the go or pack it for lunch with fruit, veggies, and other sides to fill bellies and satisfy any cravings!
Ingredients
Most of this recipe’s ingredients are pantry staples, so making homemade granola bars is quite simple and much healthier than store-bought snacks! Here’s what you need:
- Quick oats: since this is a no-bake recipe, quick oats are the better choice. Old-fashioned oats may be tougher to chew but they work just as well!
- Crispy rice cereal: adds a nice crunchy texture.
- Salt: just a little to enhance all the flavors.
- Raisins: tons of nutrition!
- Butter: or coconut oil to make this recipe dairy-free.
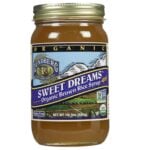
- Brown rice syrup: helps to hold together all the ingredients. Get it here.
- Brown sugar: to sweeten the granola bars and bind the mix.
- Vanilla: makes everything more delicious!
You'll find the measurements in the recipe card below.
How to Make Oatmeal Raising Granola Bars
This healthy Oatmeal-Raisin Granola Bars recipe involves minimal work and no baking at all! So, let’s grab the ingredients and make these bars while we give the oven a break. Check how to make this recipe:
- Prep
Line an 8 x 8-inch or 9 x 9-inch square baking pan or glass baking dish with parchment paper. - Combine dry ingredients
In a large bowl, mix the oats, cereal, salt, and raisins. Set aside. - Make the liquid mix
In a small pot, melt the butter, syrup, and brown sugar. When it starts to boil, reduce the heat to medium-low, and cook for 4 minutes, making sure the mixture continues to minimally bubble while stirring often. Turn off the heat and add the vanilla. - Combine
Pour the liquid mixture into the dry mixture. Mix well to combine all ingredients. - Press down!
Place the oaty mixture into the square baking dish. Cover with parchment paper, and press down with your hands until the mix is well packed. Just when you think you've pressed down enough, press some more! - Chill & slice
Allow the pan to cool at room temperature for at least 2 hours. Lift the parchment paper out onto a cutting board, slice into 12 bars, and store in an airtight container or ziplock bag in the pantry.

Is there a substitute for brown rice syrup?
Brown rice syrup can be substituted with corn syrup. Both have the same texture and help bind the ingredients together. I do not recommend swapping it out with honey or maple syrup, they do not have the same elasticity as brown rice or corn syrup.
How to Store Them
Once you cut the bars, store them in a ziplock bag or an airtight container for up to 1 week in the pantry. I don’t recommend freezing these granola bars since they get soggy.
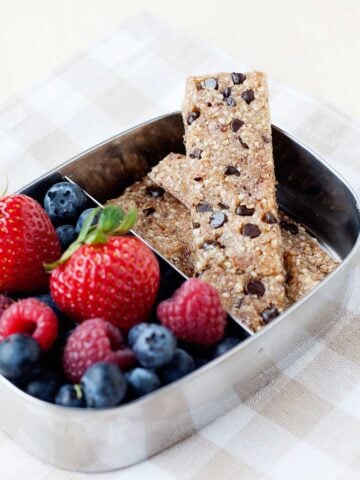
Pack No-Bake Granola Bars for School Lunch
These Healthy Oatmeal Raisin Granola Bars are a terrific addition to any lunchbox. Follow these hacks to pack epic lunches like a pro:
Keep it separately
When packing these granola bars for school lunch, keep them separately wrapped in parchment or wax paper and place them in their own compartment so they don’t absorb any moisture or other ingredients’s flavors.
Make it a meal
Want to add extra nutrition to the lunchbox? Build a balanced meal by packing these Oatmeal Raisin Granola Bars along with veggies, fruits, deli meat, hard-boiled eggs, healthy desserts, or your kid’s favorite school snacks.

Chewy Oatmeal Raisin Granola Bars
Ingredients
- 2 cups quick oats
- 1 cup crispy rice cereal
- ⅛ teaspoon salt
- 3 tablespoons raisins
- ¼ cup butter or coconut oil
- ¼ cup brown rice syrup
- ¼ cup brown sugar
- 1 teaspoon vanilla
Instructions
Prep:
- Line an 8 x 8-inch or 9 x 9-inch square baking pan or glass baking dish with parchment paper.
Make the bars:
- In a large bowl, mix the oats, cereal, salt, and raisins. Set aside.
- In a small pot, melt the butter, syrup, and brown sugar. When it starts to boil, reduce the heat to medium-low, and cook for 4 minutes, making sure the mixture continues to minimally bubble while stirring often. Turn off the heat and add the vanilla.
- Pour the liquid mixture into the dry mixture. Mix well to combine all ingredients.
- Place the oaty mixture into the square baking dish. Cover with parchment paper, and press down with your hands until the mix is well packed. Just when you think you've pressed down enough, press some more!
Chill and slice:
- Allow the pan to cool at room temperature for at least 2 hours.
- Lift the parchment paper out onto a cutting board, and slice into 12 bars.
Storage:
- After cutting the bars, store them in an airtight container or ziplock bag for up to 1 week in the pantry.


Tiffany says
I make it and I like it
Sara Bye says
So delicious! I didn’t work quick enough to mix the syrup with the dry ingredients so they were a little more crumbly than I would have liked, but that is my fault to make them while getting children ready for school. To remedy I made a little extra syrup, mixed and then tossed in the microwave for 30 seconds before pressing down into bars. Also, I wanted to up the nutritional content so I added 3 TBS of chia seeds and a half handful of pumpkin seeds. Also, to that second set of batch I used Date Syrup instead of more brown sugar. Not sure if I totally replaced the brown sugar with date syrup what would happen. Thoughts?
MOMables-Laura says
Hi Sara, I’m not 100% certain what would happen if you replaced the brown sugar entirely. They might be a little more soft, but if you keep them refrigerated it shouldn’t be a problem.
Shari says
These are so delicious and addicting! I had never tried brown rice syrup before and now I want to experiment with it more! Thanks so much for sharing the great recipe!
Dee says
Making an adult version adding 2 tablespoon each of peanut butter and protein powder…how much more rice syrup to bind?
Thanks! These are great!
MOMables-Laura says
An additional tablespoon should work!
Katie says
Wow! After trying many recipes, I’m so glad I came across this one! So good! I made them for my girls, but I think my husband and I ended up eating most of them…oops. Time to make more!
MOMables says
I am so glad you enjoyed them! Thanks for following me :)
Katie says
I tried making these tonight but I got confused on the Ingredient list. Do I add brown rice syrup, honey, and brown sugar with the coconut oil or just some of them? Please advise. Thanks!
MOMables says
Katie, In a pan, you melt the binders (butter, brown rice syrup, brown sugar). then you add vanilla. when that mixture is done, you pour it into dry ingredients. all wet together, all dry together then mix.
Michelle says
What else can I use besides the rice syrup, someone said Karo syrup? I just do not have the money to invest in the syrup 15.00 here to buy it.
MOMables says
You could use Karo syrup, though it isn’t the healthier, but I understand not wanting to spend the money on brown rice syrup! You may also have success with honey.
Jack says
I am a newly-diagnosed diabetic, and am avoiding sugar and flour. Is there any way to adjust this recipe to suit my needs? Thanks!!!
MOMables says
unfortunately not. the rice syrup is what holds it together. sorry!
kyrielslight says
would the stevia syrup work in its place? I know my diabetic neighbor uses hers in place of honey as a sweetener in some recipes.
MOMables says
Yes that should work!
M says
They are super good, but some of my dry mixture didn’t get coated and so they are really crumbly. And a bunch of dry oats/krispies. Any advice? Kind of the same thing that happened to the other poster.
MOMables says
an even coating is key. pressing down firmly is essential, and allowing them to fully dry is the hardest part. Add an extra tablespoon of brown rice syrup next time.
Amanda says
Tried them today and they are tasty. It can be difficult to find snacks that are nut, dairy, wheat free that non allergy kids will enjoy. This one is going to school for snack tomorrow. Thank you!